Sunday, June 5, 2011

I'm a Moda Bakeshop girl!! Or: Summer Squares - Tutorial


Can you believe it? Nope, me neither! =D

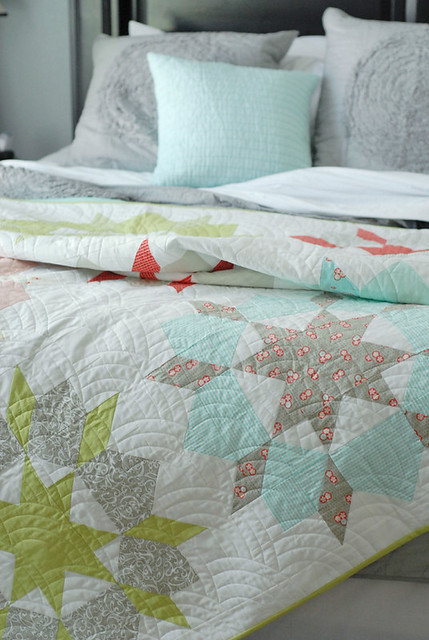
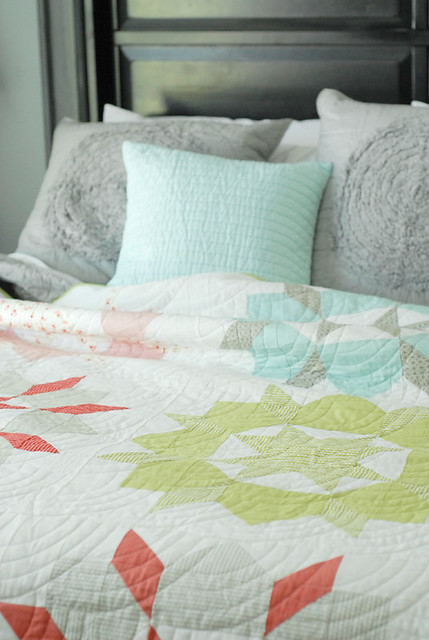
I can't stop smiling, I'm one of Moda Bakeshop's Chefs! I couldn't be happier or more honored to be a part of this fantastic group! I've been having such a difficult time not telling (read: cry it out from the rooftops) ever since I found out back in December. The very first project I get to share is what came out of this sketch, my Summer Squares Quilt (thank you mom for the great name!).

I'm super excited to share my very first pattern with the world! Presenting, the finished product:

EDIT: Unfortunately after their wordpress crash this tutorial is no longer available on Moda Bakeshop, however, it is available for FREE in my Facebook group


Please hop over to Moda Bakeshop to read my tutorial (no longer available there, it's however available for free download in my Facebook group) on how to make this quilt, including the simple trapunto technique I used for the appliques. I've been so nervous but in a good way, you know: What if people don't like it? What if I make a mistake in yardage calculations (I'm the queen of those) etc. But now it's all released and I'm just feeling so proud. I'd be so happy if you'd leave a comment over there, and if you decide to make one of these quilts based on the tutorial, I'd be even happier if you sent me an email with a photo so I can show it off here on the blog =)


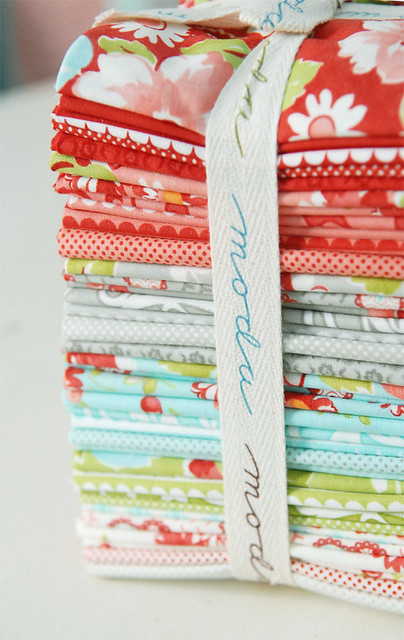
It's such a quick, easy quilt to make but so much fun thanks to the applique details. You also get to show off whatever fabric you're using quite well with the fairly big squares. I didn't want to finish this quilt while I was making it, the fabrics where such a pleasure to work with, such pretty summery colors and beautiful but still cool prints!

Saturday, June 4, 2011

Skinny Sunkissed Table Runner

So I finished up my "Skinny Verna" version, from a tutorial you can find here on Moda Bakeshop, though mine is more of a "Skinny Sunkissed" =)


It was an excellent way to use up really tiny scraps of my jellyroll and I love the way it came out. The weather sadly didn't permit any nice pictures so these will have to do. I also discovered how much I dislike doing straight line quilting now that I have an alternative... It's just so, so time consuming.


 In it's place with our loved ones.

Friday, June 3, 2011

Ruby Dreams

Right now I'm all snowed in on Ruby, my dreams about this fabric collection is border lining erotic to be honest, I have something very close to a schoolyard crush on it. You know the kind, every waken hour of your day it pops into your mind, and suddenly at the squash court your realize you just barely evaded being hit by the ball - because you where dreaming up quilts of it!

Why oh why can't it be available now?!


Ruby is the new fabric line from the ever so talented Bonnie and Camille. This line is just so pretty, all soft colors but still so cheery. I just can't stop looking at it. The pretty red would make it perfect for my bedroom and the other colors combined with that soft, perfect gray.... It's love, can you tell? ^^
Everyone should take a look at Camille's blog for some serious inspiration, she's a fantastic designer, takes beautiful photos and seems like a fantastic person, I always get a smile on my face reading her blog. 

I bought the Swoon pattern as a PDF today (first time doing that, messed up and bought it from the company paypal, fiance - not happy with me) and it was the BEST thing! I can really recommend it! SO much fun to be able to get my hands on the pattern pretty much right away and not have to pay customs on arrival and wait for weeks for it to arrive from the US. I don't think I've ever before have wanted to purchase a pattern and fabric to make an exact replica of a quilt before, but in the case of the fantastic Swoon pattern combined with the beautiful Ruby fabric I'm seriously, seriously considering it, I mean, just LOOK at it! It's just to stunning for words!


Here you can see it in almost full glory at quilt market (one day I will go to the US and attend this event) with it's equally pretty designer Camille, with who's kind permission I'm borrowing these fantastic photos from her blog, thank you!=)


Tuesday, May 31, 2011

My first baby shower - Silly Kitties Baby Quilt

A couple of our very dear friends here in Malta are having a little baby girl in about a month. So this Friday I'm going to my very first baby shower! I'm super excited! However, since the dad of the family is Swedish and thinks a baby shower would be weird they've arranged a "Baby BBQ" (no babies will be barbecued I promise ^^) instead and the men are invited too. =)

I thought this was a lovely opportunity to finish up my Silly Kitties baby quilt, I ended up binding it with black Kona instead of the fabric I was hoping to use. I've also made a few matching onesies to go with it with little appliqued motifs.


I even made my very first label! I'm ashamed to admit I up until now always "forgot" to put one on...


The onesies, the baby is to be named Alexandra, hence the A and the doggy is because her parents are more dog then cat people so I figured it'd be good to balance out the cats a little.


On the back of the doggy one I put a big, pink pawprint on the tushie, isn't it adorable!


All wrapped up good and girly in pink tulle and ready to go. My first baby Shower/BBQ gift - I'm growing up ^^

Saturday, May 28, 2011

Tutorial - Sunkissed Summer Squares Table Topper

I've been playing with the scraps from my Sunkissed project and I've been having so much fun! The result amongst other things is this adorable little table topper which I thought I'd create a quick tutorial for as it's a great way to use up a few jelly roll scraps.

Sunkissed Summer Squares - Table Topper


Materials
18 jelly roll scraps (or 2,5" strips)
2 2,5"x white width of fabric strips for borders
2 2,5"x width of fabric strips for binding (or leftover jellyroll pieces)

Step 1 - Cutting
Sort your jelly roll scraps, you'll preferably use 18 different ones - the longer pieces will be the borders, the shorter ones will be centers. Cut nine 2,5" squares for center pieces. From your longer scraps cut one 2,5" squares and one  4" strip from each.


Split the border pieces down the middle so you get two 1,25" wide pieces from each.


Step 2 - Assembling your blocks
Attach the short border pieces to the sides of the square and then add the longer 4" borders.


Make 9 blocks.

Step 3 - Assemble your top
Choose a pleasing layout for your blocks and sew them together.


Step 4 - Add borders
Add 10,5" of the white borders to the sides and then add 14,5" inches to the other sides.


Step 5 - Add applique and quilt
Add your applique using your preferred method, I used raw edge applique and Steam a Seam fusible web which I think is a great product, really easy to use. The flower applique I used will be available for download in a few days should you wish to use it. =)
 

I attached the applique with the batting and backing in place hence quilting it at the same time.
Quilt as desired. I quilted it with a loop the loop pattern with some flowers mixed in.

Attach binding and you're done. One super summery, really quick to make 14½" x14½" table topper!


If you decide to make your own table topper based on this tutorial, or any pattern of mine - I'd love if you add it to my flickr group and thereby share it with me and the world so we all can enjoy it and be inspired by it: Not Only Quilts - Share Your Creations 

Friday, May 27, 2011

Sock Monkey and Sock Kitty!

Me and Tova has spent the day finishing up our sock monkeys, however as I really don't like monkeys (I know, I'm a terrible, terrible person - who doesn't like monkeys??) I decided to go for a sock kitty instead! =)


We have to take lots of step by step pictures for Tova's teacher in Sweden, and since you stuff a sock monkey through the crotch we wanted to take some pictures of sewing it up. However, we did not realize exactly how weird this photo would be until we actually saw it, safe to say - it did not get sent to her teacher =D

Sock Monkey Factory - I just love this picture, we have so much fun during our classes!


When we where taking pictures of the fruits of our labor, Diana of course came to join, which resulted in the sockies going for a kitty ride. My sock kitty is named Kiki and Kiki and Diana are becoming very good friends ^^

Thursday, May 26, 2011

Fairy decision & I'm in a flyer!

When I was in Sweden I picked up a couple of these flyers from Mias Quiltbod as they to my great delight and happiness contained one of my WIPs from the summer quilt camp! I was so honored and happy and I just can't believe I've forgotten to blog/brag about it from February when I found it!


Do you recognize my my somewhat wonky cubes in the top right corner from this post: UFO - UnFinished Object.html? I'm ashamed to say that nothing more has happened to those cubes since that post. But maybe later, I have so much fun new fabric to play with that I can't very well stay in the past now can  I (poor excuse I know, now when they're famous and everything ;) )?


I also made a decision regarding the Fairies and I decided to remove the pink line,  turns out it was a good decision no?


I've also been playing with my Sunkissed by Sweetwater scraps, this fabric line is so beautiful that I'm determined to use up every single scrap of it! I'm turning them a Sunkissed version of this beautiful table runner from Moda Bakeshop: Skinny Verna Taberunner. Right now I'm having fun playing with color and values. There's so much joy for me in working with these pretty colors you wouldn't believe it!


Me and my sewing student have "sewing in stretch fabric making a soft toy" on the schedule lately and we've been turning a pair of socks each into sock monkeys or in my case something similar, will share more about that later and I leave you with this image of one of Tovas socks in preparation mode.