It is the perfect little evening bag, very high end and exclusive looking with it’s frayed seams and very structured shape. It’s got a fully lined zipper pocket and an open slip pocket for your cellphone and you can chose to make it with or without handle connectors.
The Florence Frayed Bag pattern is available in English and Swedish HERE.
The Florence Frayed Bag is absolutely a new favourite for me, so fun to sew and you will for sure get the question ”where did you buy that bag” when you wear it!
This one I made from a thrifted denim shirt. This pattern is perfect for repurposing those denim clothes, fraying curtains or upholstery fabric you might have on hand. The lovely silver vinyl and bag hardware is from Borlänge Sycentrum.
It's surprisingly roomy despite it's small size.
The zipper pocket is fully lined and it has a slip pocket for your cellphone.
I LOVE this little bag! It just makes me so happy! I love how it can take any outfit from "nice" to "WOW!" This Florence Frayed Bag is the one I made for my YouTube tutorial for this pattern and I just can't get over how something can be so cute AND be so fashionable at the same time you know?
This version I made in a pink boucle fabric bought from a local shop, I'm sure you can find similar in most fabric shops today as it's a popular fabric for dressmaking.
It's such a fun sew and I hope you'll love it as much as I do!
I'm so excited to finally be able to release the Almora Bag! It is a great everyday bag, fits so much more than one would think based on it's dainty appearance! The rounded, puffy and sweet outline combined with the safety of the zipper closure and it's interior zipper pocket makes it perfect for a day on the town!
It also has a YouTube Video Tutorial where you can sew along with me!
The Almora Bag was an instant new favorite for me, fun to sew and looks so high end! This bag is both stylish and secure. I just ADORE mine and see many more in my future!
This beautiful quilted look vinyl is available from several places right now, but I bought mine from Do or Dye Custom fabric: https://doordyecustomfabric.com/
This versions exterior is made all in quilting cotton, with only the accents in vinyl. The quilting cotton is from a local shop, the vinyl from: https://borlangesycentrum.se/
The interior zipper pocket is large and easily accessed.
The bottom is sturdy and broad, making the bag nicely roomy.
I've had a few requests making it possible to sew the Sedai Wallet from the very popular A4 sheets of vinyl available, so I've got an alternative method of construction here for you making that possible!
This method is also for those of you who might find step 14 of the pattern a little tricky. This is the Sendai I made using this method. The interior is only slightly different, instead of folds, the middle section is separated to two pieces. Let's get started!
Please just supplement and/or replace the following steps in the pattern with the below.
Please pardon the lack of buttons in the photos below, I didn't get the right ones til after I'd taken the photos. Please know that the following tutorial won't make sense unless you have the pattern at hand.
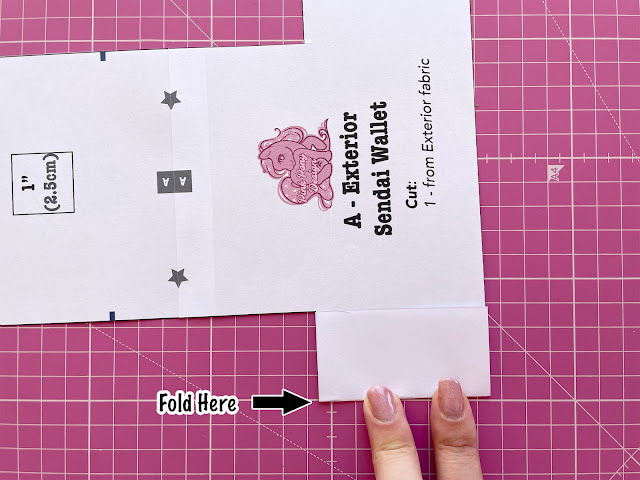
Step 1 - Preparations
Fold the "wings" of the pattern template in half to mark the middle, and then cut them in half along the fold.
You'll now be able to fit all of the exterior pieces into a single A4 sheet, so you can use such pieces of vinyl.
Skip steps 10-11
Step - 12
Place your tape along the wrong sides of the long side of the loose "wing sections" instead and tape them in place just below the marks you make in this step according to the pattern (red marks).
Step - 13
Sew down the taped sections carefully and slowly with 1⁄8” (2mm) seam allowance, leaving long thread tails when you start and stop so you can tie them off. Turn it over and sew from the back of your piece, so you easily can match your seam exactly with the seam already on the back.
Step - 14
Fold your wallet in half with the lining side out and match up the raw edges of the "wings", clip in place. Sew together the"wing" sections carefully and slowly with 1⁄8” (2mm) seam allowance, leaving long thread tails when you start and stop so you can tie them off.
It will look like this from above after sewing the wings, just turn the wallet right side out and you're done!
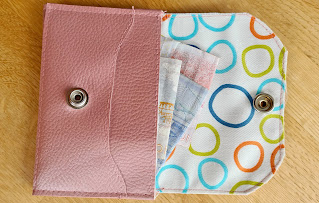
Tada!! You'll now have a beautiful Sendai Wallet!
If you want to learn exactly how I apply the pretty, iridescent edge paint to this wallet, please see this video:
The Sendai Wallet PDF raw edge wallet pattern is such a cute and quick make! The perfect mini wallet for when you only need to bring the essentials in a beautiful little clutch for a party, or why not put it directly in your back pocket? Also a lovely and quickly whipped up gift for anyone!
The little Sendai is such a fun sew, especially if you use the included SVG file and let your cutting machine do all the "hard" work. Perfect for cork fabric, vinyl, leather, faux leather, kraft paper and more!
It can be sewn unlined or lined depending on how stiff you want your wallet to be. The beautiful printed cork is from: https://www.frameyourbag.com/
A little video intro:
I recommend that you don't do as I do, but instead do as I say - and do a lined version if you want to use edge coat, this was super tricky to get even somewhat nice on this without a lining.
~~~~~~~~ ♥ ~~~~~~~~ ♥ ~~~~~~~~
My amazing pattern testers were awesome as ever and tested the pattern for me, and they have done such an awesome job! A sincere thank you goes out to each and everyone one of you for helping me make each new pattern - into my best pattern yet!
I'm so very grateful for all your help and hard work, I could not do this without you!
Pia Jestin - can be found here on Instagram made this lovely set of wallets:
Anne-Le Wängelin - whom can be found here on Instagram made these two lovely versions:
Ann Munthe Svensson - whom can be contacted here: ann.b.m.ams@gmail.com made this cute pink version:
Barbara Dörig - Whom can be found here on instagram made this lovely pink version:
Sheri Ferrano - of Munkee Made designs made these beautiful cork versions:
I'm quite often asked what presser feet I've bought extra for my Juki TL-2200QVP mini, so I've made a YouTube video showing my favourite presser feet for bag making. 😊
It was going to be a blog post, but there was just so much I wanted to talk about, it had to be a video. The right presser foot for the job can really up your bag making game, and give you much better, more professional looking results!
In this video I'm sharing my favourite presser feet for bag making. I'll also be recommending what feet to buy as to start with as it can get expensive to buy them all in one go. I'm in no way affiliated with Juki or any Juki shop, I'm just a fan of my machine.
I switch feet often as I make a bag and there's sooo many great aids in the presser feet department for this semi-industrial and other industrial machines, as this machine uses industrial feet. I highly recommend investing in a few extra presser feet to make bag making more fun!
I made a YouTube tutorial showing how to sew your own, beautiful and practical half check dog collar! This type of collar has many names, half slip collar, martingale collar and more but it's a super convenient kind of collar slip on and off, with no risk of the dog backing out of it, nor does it choke your dog.
Convenience: Slip it on and off without any need for a snap or buckle. This is great for shy or scared dogs that might find the snap of a buckle loud and scary, for dogs with long coats which might tangle in the buckle, or for dogs that just don't have the patience to stand still while the collar is adjusted and secured.
Safety: As we make this collar exactly to size, there's no risk of our dog being able to back out of the collar or escape it, while the collar doesn't choke or strangle the dog.
Comfort and coat: If you have a long haired dog, a tightly fitted regular collar might cause unsightly "waves" in the coat from the collar, but as this collar is large and loose when the dog is't pulling (which makes it very comfortable for the dog to wear too!) and therefore reduces this effect from the collar.
The reason for this tutorial is that have a new little family member as of a little over month now! Lilla My is a 1,5 year old Sheltie girl whom has found her forever home with us! We love her soooo much!
She of course urgently needed her own Tula Pink collar! Lilla My really loved her new collars, and when I tried to have a photo shoot with the finished collar, she promptly laid down to sleep on my background! I could hardly protest this (despite the black hairs now all over my white photo background) as it's her collars right? =D
The collars in the video are made with Tula Pink fabrics, my girl needs to be dressed in style right!? The wider collar is from Tula's Zuma line, the beautiful "Glow fish" print. And the thinner one is the "Disco Kitty" print from her Tabby Road line.
Isn't she fashionable on her walk? =)
It's really easy to make and such a fun sew, properly addictive! Such a great scrap buster too!
And I'm going to end this post with two more photos of my lovely cutie, just because I can ;)
I'd love to see if you make your own collar using this tutorial, please share you photos in the Facebook Group, or tag me on social media <3
The secret to really professional looking cotton bags boils down to two things in my humble opinion - interfacing and pressing. Both subjects I cover in my latest YouTube video. I quite often get the question about how my bags can look so crisp in photos despite then being made from cotton with fusible interfacing. For this look - the importance of taking 20 minutes pressing your bag after finishing it can not be stressed enough! I try to share this during my classes, but it's not always we have the time to talk about this to the extent I'd like. So I made a little tutorial showing how I do this.
It'll give you better quality then the embedded version.
In this video I also show how I use my beloved Clover Mini Iron II, it's such a great tool! Here is also a sneak peek of my BRAND NEW BAG design! The bag is not completely finished in this video, but it's a good hint. ;)
It'll give you better quality then the embedded version.
I've gotten a lot of requests in the past for more video tutorials so I'm trying my hand at making more, I'm brand new at this and the quality is not great but I'm trying and working hard on bettering myself. I hope you'll find this video informative and helpful despite its lack of polish (yes and that goes for both the film work and my horrible gardeners nails!) *lol*
I have this obsession to when it comes to organizing and storing my cotton fabrics. I need to se them all at a glance and I love having them in rainbow order. So I made a little video showing how I fold and store my fabrics.
I store most of my cotton fabric in an IKEA "Billy bookcase" with "Oxberg glass panel doors", to prevent the fabrics getting so dusty - while still allowing a nice overview. I try to sort by color for that pretty rainbow effect. But it's not always possible, some fabric just doesn't "read" like a single color, so those I have at the bottom there in the "messy and yardage section" *lol*
I published a photo of a quilt block I'd sewn, and I got quite a few private messages on Instagram asking me how I get my seams so flat, so I made a little video to show the importance of setting your seams, and how to do it. This is the photo that I posted, a cute simple square in a square with fabric from Kate & Birdie and Kona Cotton.
I highly recommend clicking the "Watch on Youtube" link in the video as this low quality won't allow you to see what I'm talking about. Video is available here: Watch video.
When we sew quilt blocks, we usually do not sew with a dual feed presser foot, which causes a slight stretch/tension in the fabric on top compared to the fabric being fed at the bottom by the machines feeders; which is why the top piece usually comes out longer than the bottom one, despite being totally equal in length when the seam was started. This causes the fabric, when the seam is sewn to have a slight "waviness" to it, as the fabric has been stretched slightly. This can be made worse from improper thread tension. Adjusting your presser foot pressure (usually reducing it) so your seams come out as flat as possible, while still retaining enough pressure to make a nice seam will help this. However, a slight waviness is difficult to get rid of. Starching your fabrics with spray starch before you cut it is a great way to reduce this issue too. However for baby quilts such as this one, where you don't wish to spray the fabric with a bunch of chemicals is not desirable. This is where setting your seams come into play.
Setting your seams is something the old school quilters amongst us will say is such a standard thing to do that it doesn't warrant a post, but I've found a lot of new quilters don't know to do this, and it makes such a difference!
Set your seams:
Start with your block in the same position as when you lifted it from your machine, don't open up the fabrics, just lift it from the bed to the pressing table. Here you can see the little waves in the fabric.
Put your iron on the cotton setting. With or without steam is a personal preference, have you pre-shrunk your fabrics properly with a hot iron with steam, you can use steam here to without danger to distort your block. Set down your iron on the block and give it a good press. Here you can see how flat it becomes, the waviness is gone!
Next press your block like you normally would (I'm pressing the seams open here which I normally don't, as it's for a baby quilt so I want it as flat as possible).
And enjoy your perfectly flat, beautiful block!
In the video there's a comparison with a block with the seams not set. Leave your blocks to cool flat on the ironing board, preferably even under a heavy book or a quilt ruler to let the fibers set in place flat before moving them.
Hopefully this will help you to get your blocks properly flat and beautiful!