Sunday, March 12, 2017

The Bia Bag by Maria @ Finished Seams

Pink Pony Design is soon a year and a half old, and when I stumbled upon this STUNNING Bia Bag made by the super talented Maria over at Finished Seams, blogpost here, I started thinking of the fact that this little bag is what started it all. If I hadn't decided to make this pattern to try my hand at pattern making and finding it to be so much fun, maybe Pink Pony Design wouldn't exist today, so thank you little Bia Bag <3 Free Bia Bag pattern is available here.

Just look at this stunner! The fabric choices are just absolutely fantastic (I just have to make my own map fabric bag now)!

Can you believe me when I tell you this is her VERY FIRST home sewn bag?  Me neither, but it is! Fantastic job! 

Look at all the stunning details of this! those handmade leather handles really make the whole thing pop! Thank you Maria for letting me share your stunning work! <3


The Bia Bag pattern is not totally up to par with the quality of my new patterns, and it will receive a much needed makeover in the future, however, it's still a very easy to follow pattern, and clearly one can make a super fancy Bia Bag as ones very first bag! Make sure you pop over to Marias blog to see all the little details on how she made this lovely bag!

Tuesday, March 7, 2017

Cali Card Holder - Manly Orange Version

Upon seeing the Cali Card Holder, Erik immediately announced that he wanted one for himself. And there's nothing more fun then when my honey wants me to sew for him so I got right to it!

So a "manly" version without frills like zipper end covers (because he wanted the pocket to open fully) and hanger was born. Just a plain card holder with a pocket for his headphones.


He chose the fabrics and zipper himself, I think it came out great! I don't work a lot with orange so it was fun to get out of my normal color comfort zone. It's made with Joel Dewberry's beautiful fabric paired with some Kona Cotton.


Monday, March 6, 2017

Introducing - The Cali Card Holder!

I really wanted a clever little card holder/wallet for those pretty little handbags that unfortunately come without any such interior solutions, but are too small to fit a normal wallet. The Cali Card Holder was born!


It is a very handy 4 3/4" x 3" finished, has three card pockets (which can double as cash pockets) and one zippered compartment (naturally fully lined) for coins or keys or anything else you might want. It has a keyholder/hanger for when I use it in my bigger bags, so it doesn't get lost. The backside is plain.


The pattern is with my testers as we speak so hopefully it should be ready within a week. =)

Friday, February 24, 2017

How to reattach a zipper pull - Video tutorial

I've been contacted by several people who are very uncomfortable removing zipper pulls and reattaching them. Since I do so quite often in my patterns, for example in my free Racoon Case Sunglass Case pattern I thought it was long overdue with a proper video tutorial! It's also available in my youtube channel.


I love replacing my zipper pulls with contrasting ones or just prettier pulls, and while the first few attempts at this might be frustrating (and sometimes being two people can help), once you get the hang of doing this, it's actually really easy! And being able to remove the zipper pull makes working with zippers in so many instances so much easier =)

A few examples of where I've used contrasting zipper pulls, isn't it cute?


I hope you will find this tutorial easy to follow and that it will boost your zipper confidence!

Monday, December 19, 2016

It's not too late to make a few christmas gifts!

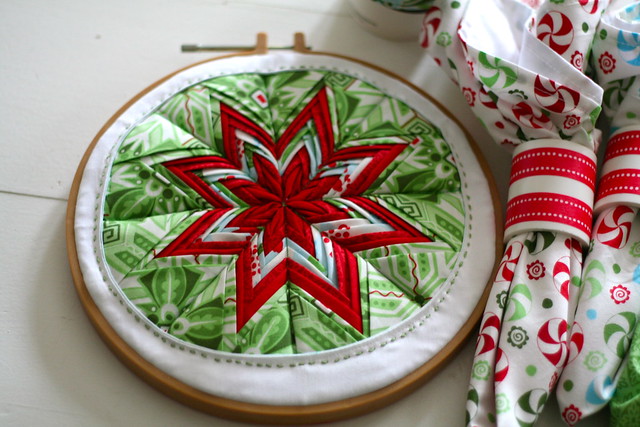
For those of you who've already finished christmas shopping, you might still have time to squeeze in some christmas sewing! If you haven't already tried making a Fancy Folded Star, now might just be the right time to make one for that hard to buy for relative, or maybe just make one for yourself? Make a Potholder, a Pillow or why not a little Ornament?


Here are a few beautiful Fancy Folded Stars I've found around the net to help get you inspired!

Look at this gorgeous one from hopefully {something} cute:


Or this stunning one by Made By Cola:


Or this tiny adorable ornament one by A Stitch In Between:


And this lovely one made by Karen over at Easy Patchwork:


Hopefully I've inspired you a little, if you make one, make sure you tag me on social media so I get to see it <3

Friday, November 18, 2016

Nordic Sewing and Inspirational Weekend - Post 1 of 2

I spent this past weekend in Jönköping at the biggest Sy- och Inspirationshelg in the Nordic countries. It was an honour to be invited to teach classes there and I hope my students had even half as much fun as I did! I have a ton of photos and so much to share I think I'll divide this into two posts =)

There was a lot of preparation, as half a day was removed from the Stockholm Bag class, I had to cut and interface all the bags for everyone in the class, which turned out to be a whole week of work! I'm so grateful for the help from my parents and my dear friend Ursula who also came along as my "help teacher" <3


It was a lot of fun to make the little kits for the Bring the Basics Bags, matching fabrics, zippers and zipper pulls was a blast!


Ursula drove me and Anki down to Jönköping on Friday the 11th with a very, very stuffed car, I was hidden in the back seat behind bag kits, and Husqvarna Epic sewing machine, ironing boards, cutting mats and everything else we would need for our weekend. We set up and made this cute little display table with some of the bags I've made.


The day after setup, we had a Stockholm Bag course, it was such a fun day but darn had I been nervous! I just really hoped everyone would have enough time to finish their bags. luckily everyone did a spectacular job and nearly everyone managed to finish their bags completely, some just had the topstitching left.

Everyone got a complete kit (in a cute pink baggy of course!) with all pieces ready cut, interfaced and labeled with their respective letters.


I'm so lucky to have had such fantastic students and help teacher, who's here helping to glue down handles.


Sewing interior pockets.

Sewing lining and exterior together.


And here's a few of the happy new Stockholm Bag owners with their stunning bags! <3


There were three different main "kits", one gray and turquoise as seen below, and three different faux leathers, one smooth, one pre-quilted in asymmetrical squares (like the original) and this version.


The pretty backside with a contrast zipper.


There was a green version with Tula Pink lanterns, very close to or exactly like the original depending on what faux leather it was combined with. This one had such a very cool decoration for the front and left her handles unsewn for a very cool and unique look!


And this pretty pink Tula Pink Chipper version modelled by it's owner, Ingrid Johnson, who has Husqvarnabutiken in Vimmerby. She also carries my patterns <3


I just also have to show you Ingrid and her friend Helena (who was holding classes in the room next to us), whom unknowingly to each other had sewn tops for the events in the same fabric, don't they look great!? And on Ingrid's shoulder is her gorgeous, matching Denver Double Zip Bag!


Thank you all for a fantastic Saturday! A post with photos from the Sunday is coming soon =)

Sunday, November 6, 2016

Denver Double Zip Bag - The Pattern!

I'm so happy to announce the arrival of my Denver Double Zip Bag pattern!

It's available in both Swedish and English in my webshop.


This little bag is perfect for a night on the town, when you want to have room for your phone, cards, money, keys, maybe a bit of makeup and some small bits and pieces. It's such a quick and fun bag to sew, you'll probably just like me, not only make one once you get started! Finished bag is ~8 x 5.5 inches big and ~1" wide at the bottom. Mine is made with Katarina Roccella Indelible Fabric Collection by Art Gallery Fabrics matched with a random text print found in my stash and a Michael Miller Cotton Couture solid.


It has two big zippered compartments, both fully lined. The main compartment also has a card holder for 3 cards, a lip balm and money slip pocket and a slip pocket for a cellphone.


But the pockets can of course be customized to fit your needs.


It's so very cute! I can't wait to make myself a black one to go with my LBD's!


I as always want to sincerely thank my lovely pattern testers! <3
They did amazing work, suggested tweaks, helped me with spelling and grammar and made such pretty versions of their own!

Ann-Kristin Kristoffersen of Kinnas Lappteknik made a gorgeous grey and blue flowery version! She's the inventor of the little double zip baggies that this bag design is born from <3


Anne Verberckmoes of Serial Bagmakers made a lovely paisley and purple version with a cross body strap instead, very practical!


Marita Tjulander of Valsan-Häxan syr/quiltar made a fetching black version in real leather! Such a lovely every day bag and such a cute kitty in the background!


Cate Sjöman - of C. Sjöman Designs made a super cute pink paisley one and a great version in quilted black! They really are addictive ;)


Jennifer MacWilliams of thisgirlissewdestructive on Instagram and Facebook, she made such a happy green version in Dear Stella Design fabrics! 


Friday, October 28, 2016

The Splendid Sampler Blocks 69 & 74

Yes, I'm very much behind, but at least I haven't given up? I'm only missing some 40 blocks ;-)

This one reminded me how much I dislike sewing anything more than 1/4 circles XD
It was a struggle and it came out wonky, I'm not a fan...


This one was fun and turned out so cute! I was hesitant about putting buttons on a quilt, however, decided to do it anyways. Need to step out of my comfort zone, that's really what this quilt is all about! I however sewed the handle separately by tracing the shape, and sewing two of them together and turning it. I like the somewhat 3D outcome of that, goes nicely with the buttons.


Thursday, October 27, 2016

Sewing with Glitter Vinyl - Tips and Tricks

I thought I’d take this opportunity to just mention a few things regarding working with heavy vinyls such as the glitter one used for the white bag in my previous post. There's quite a few things you should know to make it a fun experience.


The first time I used it I hated it, it was so darn hard to work with and I regretted buying so much of it! However, now when I've taken the time to learn how to use it properly, it's such a fun material to work with!

  • Use a walking or teflon foot In my experience, on a domestic machine it’s often best to use a walking foot when working with these heavy fabrics as sometimes the teflon foot just won’t feed all the heavy fabric evenly. However, some machines can’t keep the presser foot pressure up with the walking foot, if yours is having tension issues when working with multiple layers of vinyl, try the teflon foot, up your pressure foot pressure and try again. It should hopefully solve the issue, if you need help troubleshooting tension issues or skipped stitches, here here: Skipped stitches and tension issues help


  • Use longer stitches This is to prevent perforating the vinyl to much making it brittle and liable to tear under a little pressure (don't ask me how I know!). I sew with at least a 2.5-3.0 stitch length, while I’d normally use 2.2 for sewing bags. Also, be careful and don't backstitch if not absolutely necessary as this will also perforate the fabric unnecessarily. Use the "auto lock" or similar thread fastening feature on your machine if you have, if not, be careful and try to backstitch exactly into your previous stitches.
  • Don’t use a leather needle You don’t want to use the leather needle for the same reason, it will weaken the vinyl as it cuts when perforating - making big holes and making the vinyl more likely to tear. I recommend using a topstitch needle as it has a bigger eye so your thread won’t break and it will catch the bottom thread to prevent skipped stitches - but it still makes neat holes. Choosing a 90-100 needle to handle the vinyl without risking it bending.
  • Don’t use pin, use clips When vinyl has been perforated the little hole won't close, so use Wonder Clips instead of pins when working with vinyl. If you can't use clips I usually use double sided sewing tape or a dot or two of glue to hold stuff in place until I can sew it down.
  • Don't iron - tape or glue If you've read some of my patterns you know how I love to use tape or fabric glue to hold stuff in place, when it comes to vinyl, this becomes a necessity as you can't press it. If you want a seam allowance to stay down, glue it in place. If you want a temporary hold - use tape, either double sided sewing tape, or even painters tape if you need a temp fix while working.
  • It sticks to everything, itself, your sewing machine bed, yes everything! Which is great in some instances but horrible in others. So if you don’t have one already, invest in a teflon baking sheet which you can tape to your sewing machine bed to prevent it from sticking to it, making jump stitches or preventing it from feeding at all when you have to sew with the vinyl down. But try to avoid sewing with the vinyl side down when possible.


I hope these little tips will make your vinyl sewing experience a bit more pleasant than my first few attempts =)

Tuesday, October 25, 2016

A little glitter baggy!

I'm home alone these past few days and I've set away plenty of time for sewing, and with me and my sewing friends going on a non sew vacation to Mallorca this spring, a challenge was put forth. To sew a bag just the right size to hold ones passport, cellphone and a bit of money of course. I had to start right away! I took some inspiration from the little double zip baggies I love to make. But while those baggies have exposed seams in the lining, this one doesn't, and it also has credit card pockets and an extra pocket in the lining =)


I'm making a pattern for it now, and it's just so much fun to sew! Really quick to make but make such a statement! =D It's the perfect step up from the Bring the Basics Bag, when you need to be able to bring just a little more (like your battery pack for playing Pokemon Go, nooo that was absolutely not taken into consideration here *lol*). It's also a very pretty party clutch. Especially in the glitter vinyl.

More photos will come when I have a proper camera again, mine broke and I've ordered a new one, however, they only shipped to Sweden so Erik is bringing it for me when he returns =)